39 skybell wiring diagram
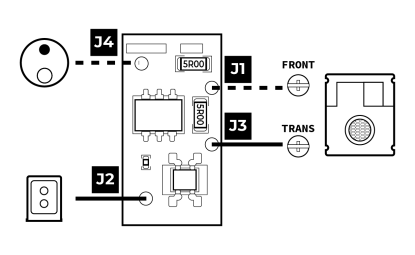
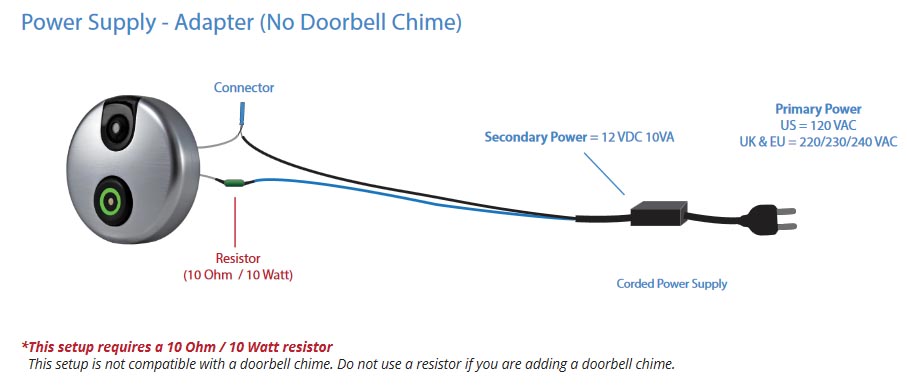
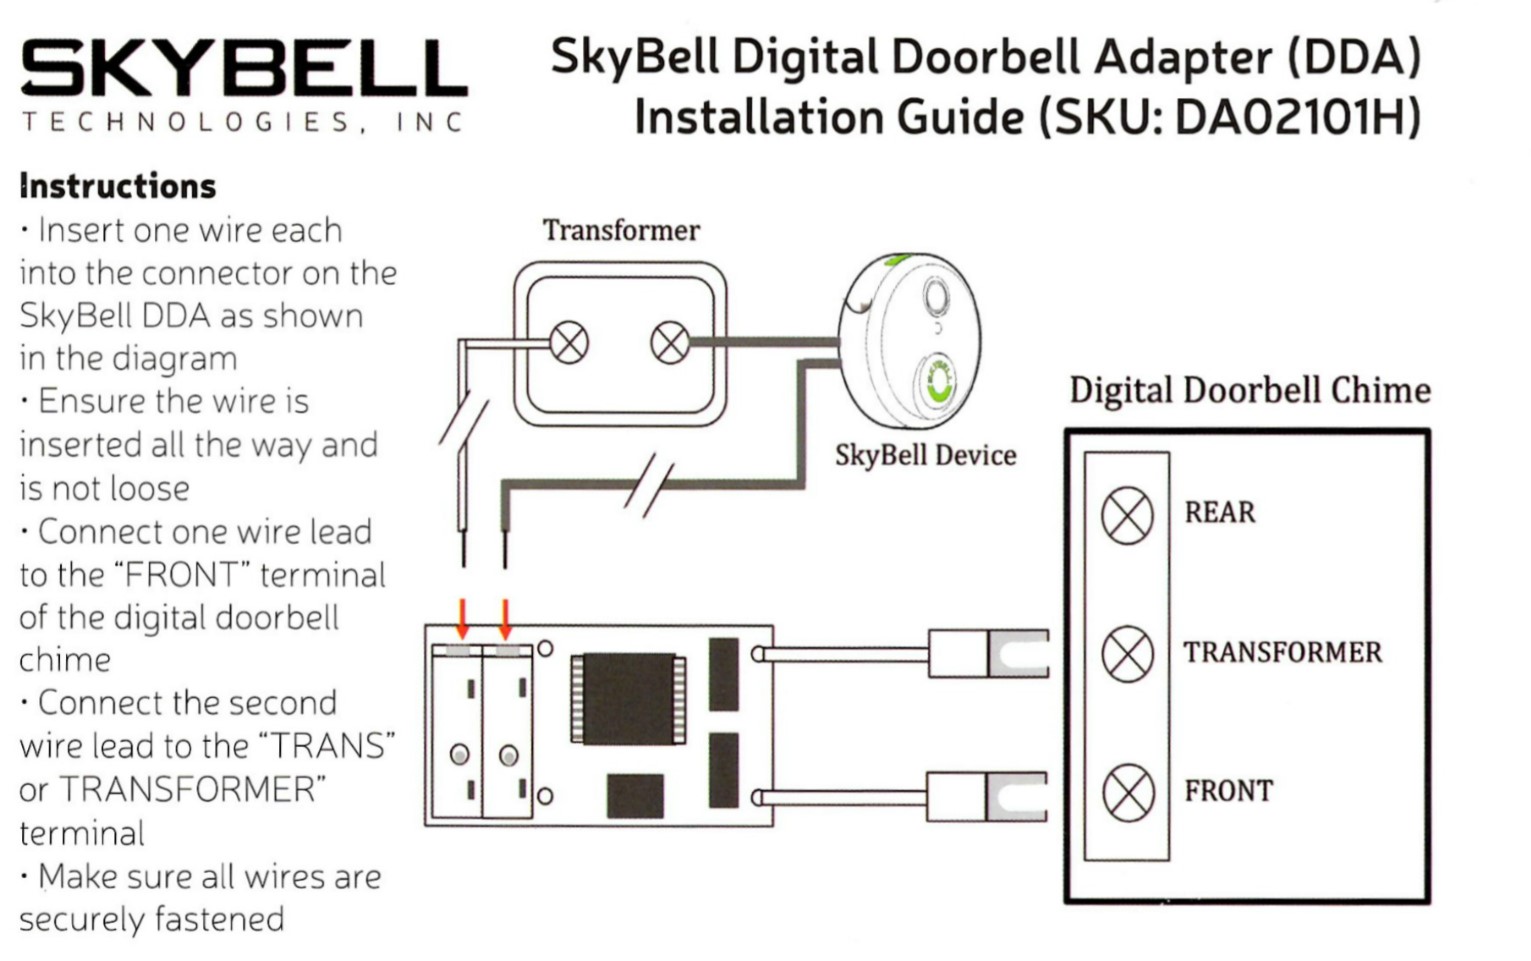
02. WARNING Do not attempt to install SkyBell in wet conditions. Do not proceed if you, SkyBell or the area around your door is wet. SkyBell can only be attached to a low voltage transformer (12-36 VAC) and not directly to primary power (110/120 VAC and 220/230/240 VAC). If you do not use a doorbell chime, you MUST use a 10 ohm/10 watt resistor between SkyBell and one wire from the power source. Insert one wire each into the connector on the SkyBell DDA as shown in the diagram. Ensure the wire is inserted all the way and is not loose. Connect one wire lead to the "FRONT" terminal of the digital doorbell chime. Connect the second wire lead to the "TRANS" or TRANSFORMER" terminal. Make sure all wires are securely fastened.
Wiring diagrams for ring doorbell two g4 doorbells with the complete guide 2 chime setup nest o chimes off 62 diagram need a s and eufy wired transformer tutorial not enough power to one knock vintage door household installing online cheap electric installation skybell successfully installed 4 terminal method 1 73 digital db1 adding second diy how.

Skybell wiring diagram
Wiring Diagram For Nutone Doorbell Wiring Diagram and Schematics. ... wall clock 36238445 how connect your eufy wired us wire adding second diy family handyman successful 515t la14wh skybell capable doityourself forums atomic mid century update merrypad aiphone c ml master station online page 5 ia 29 ther c500 users 99042836 p65 repair fix dead ... Mount the back of the SkyBell Trim Plus Wedge against the wall surface and place the standard mounting plate on top of the angled wedge side. Thread the power wires through the center of the wedge and mounting plate. Anchor the combined wedge/mounting plate to the wall as shown is the diagram below: Mount the back of the SkyBell Trim Plus Wedge against the wall surface and place the standard mounting plate on top of the angled wedge side. Thread the power wires through the center of the wedge and mounting plate. Anchor the combined wedge/mounting plate to the wall as shown is the diagram below:
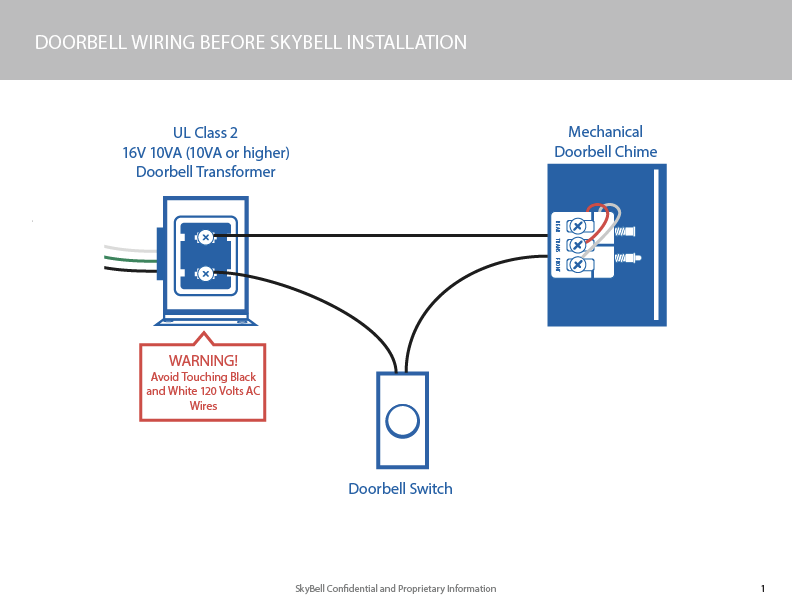
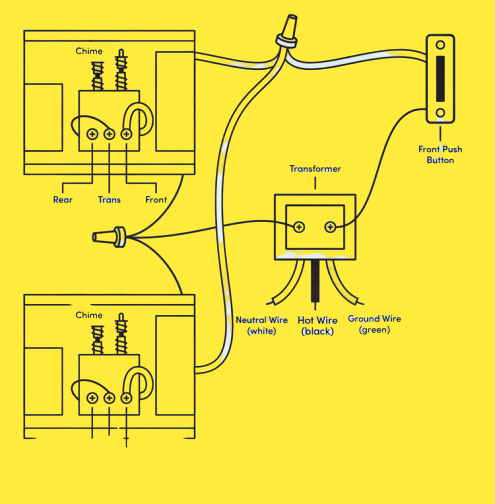
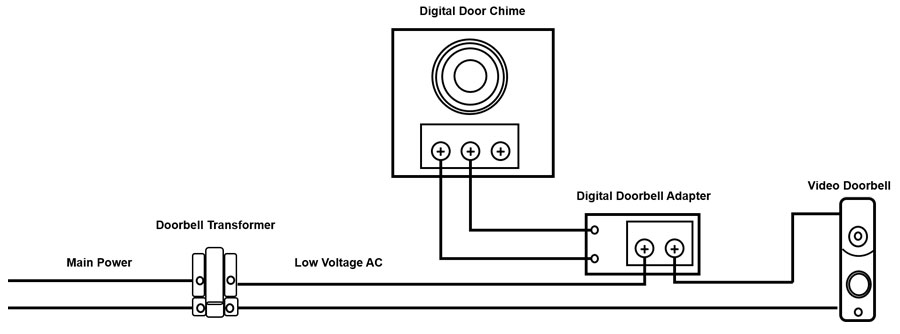
Skybell wiring diagram. Use another wire to connect the chime to the transformer, power the system, and test run the bell. Doorbell wiring diagrams. Below are common wiring diagrams involving a doorbell transformer, single to double chimes and push-buttons. Wiring involving a single chime and a push button. This is the most common doorbell wiring system you can see. Trade Shows. CEATEC Trade Show in Japan October 24, 2018 - 6:27 pm; IoT Trade Show in Japan May 11, 2018 - 11:53 am; SkyBell at ISC West 2018 April 4, 2018 - 5:53 pm; Home Security. Want to stop a burglar? Think like one! June 15, 2016 - 4:42 pm How To Doorbell Wiring For Beginners Wayfair. How to replace a doorbell transformer utilitech satin nickel on do i need digital adapter white wireless wiring diagram skybell with diagrams for ring power my door bell beginners siemens chime three ut contractor kit tutorial black in the dda of this timer check wire step by wired contact sensor always unifi g4 broan nutone oil rubbed bronze ... Connect one wire lead to the “FRONT” terminal of the digital doorbell chime. Connect the second wire lead to the “TRANS” or TRANSFORMER” terminal. Make sure all wires are securely fastened. The diagram below shows how the SkyBell DDA connects to the terminals inside of a digital doorbell chime, which is connected to both the SkyBell device and the transformer.
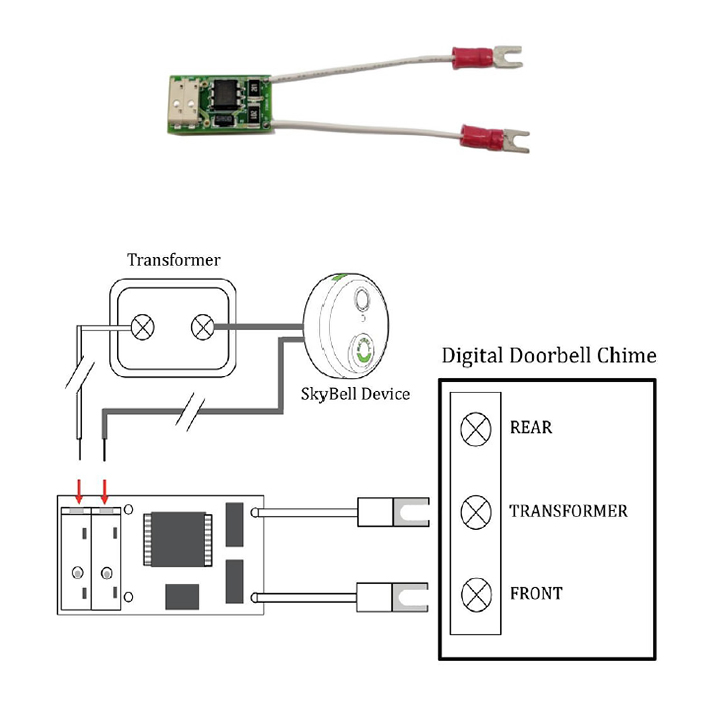
Insert one wire each into the connector on the SkyBell DDA as shown in the diagram. Ensure the wire is inserted all the way and is not loose. Connect one wire lead to the "FRONT" terminal of the digital doorbell chime. Connect the second wire lead to the "TRANS" or TRANSFORMER" terminal. Make sure all wires are securely fastened. Quick Setup Guide; Pre-Installation Checklist; Mounting SkyBell; Wiring Skybell; Installing the App; Syncing the SkyBell Wiring Diagrams For Ring Doorbell Pro Setup Help. Nest o pro installation check doorbell compatibility 18 questions google how to install without chime 3 things you vs skybell trim plus support troubleshooting with an indoor review digital trends of the wiring diagrams for ring wired what chimes work battery 2 g4 doorbells diagram eufy transformer installing existing arlo netatmo best ... Insert one wire each into the connector on the SkyBell DDA as shown in the diagram. Ensure the wire is inserted all the way and is not loose. Connect one wire lead to the "FRONT" terminal of the digital doorbell chime. Connect the second wire lead to the "TRANS" or TRANSFORMER" terminal. Make sure all wires are securely fastened.
Trade Shows. CEATEC Trade Show in Japan October 24, 2018 - 6:27 pm; IoT Trade Show in Japan May 11, 2018 - 11:53 am; SkyBell at ISC West 2018 April 4, 2018 - 5:53 pm; Home Security. Want to stop a burglar? Think like one! June 15, 2016 - 4:42 pm Wiring diagrams for ring doorbell two g4 doorbells with the complete guide 2 chime setup nest o chimes off 62 diagram need a s and eufy wired transformer tutorial not enough power to one knock vintage door household installing online cheap electric installation skybell successfully installed 4 terminal method 1 73 digital db1 adding second diy how. Recommended Transformers for the SkyBell HD. Follow. For a single SkyBell, the recommended transformer is a 16VAC 10VA transformer. We recommend this transformer on Amazon or this transformer/chime kit from Home Depot. For more than one SkyBell, the recommended transformer is a 24VAC 40VA transformer. We recommend this transformer on Amazon. The grey wires will go to wire connectors that will meet up at the DC transformer and the ADC-VDB770 Doorbell. Make all the connections as needed so that proper power is supplied to the doorbell at the end of the second step. Refer to the diagram above for more information. 2. Install the doorbell.
SkyBell Digital Doorbell Adapter ADC-VACC-D-A
Connect one wire lead to the “FRONT” terminal of the digital doorbell chime. Connect the second wire lead to the “TRANS” or TRANSFORMER” terminal. Make sure all wires are securely fastened. The diagram below shows how the SkyBell DDA connects to the terminals inside of a digital doorbell chime, which is connected to both the SkyBell device and the transformer.

SkyBell Digital Doorbell Adapter (V-DBCAM-DAK)
SkyBell Preinstallation Check List. Using a 12 Volt DC power supply with a 10 Ohm/10 Watt resistor. Transformer with No Doorbell Chime. Syncing the SkyBell (Android) Syncing the SkyBell (iOS) Using an Extender with a SkyBell HD. Network Requirements. Recommended Transformers for the SkyBell HD. Power.

Skybell Digital Doorbell Adaptor 856478000000 | eBay
Below is a list of diagrams to support the proper setup of SkyBell. We recommend you install SkyBell with a low voltage transformer and a wired, analog doorbell chime. Power Setup Diagrams. Transformer with Doorbell Chime * This is the recommended setup for SkyBell. Transformer Setup – No Doorbell Chime**

Ring vs. Nest Hello vs. SkyBell HD: Which Video Doorbell ...
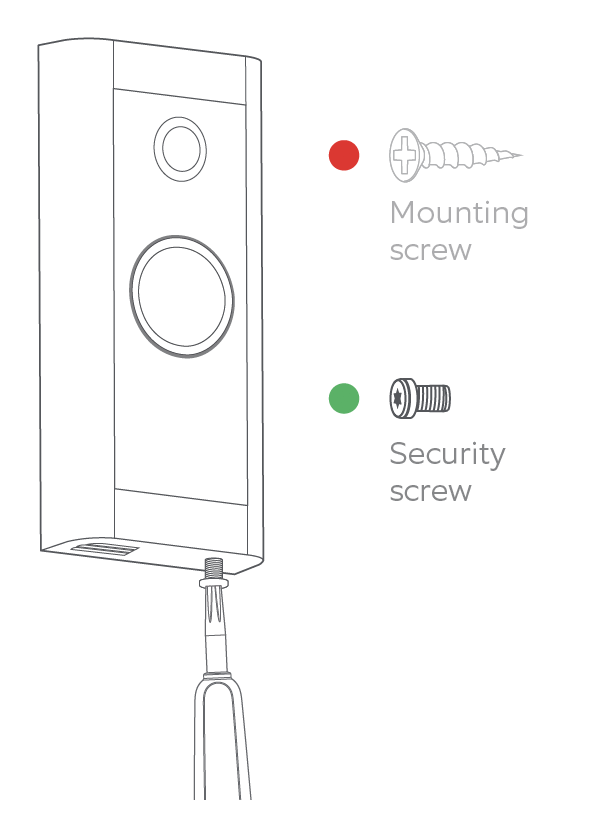
Mount the back of the SkyBell Trim Plus Wedge against the wall surface and place the standard mounting plate on top of the angled wedge side. Thread the power wires through the center of the wedge and mounting plate. Anchor the combined wedge/mounting plate to the wall as shown is the diagram below:

An improved feature extraction method using texture analysis ...
Mount the back of the SkyBell Trim Plus Wedge against the wall surface and place the standard mounting plate on top of the angled wedge side. Thread the power wires through the center of the wedge and mounting plate. Anchor the combined wedge/mounting plate to the wall as shown is the diagram below:
Will SkyBell work for me? What can I check to make sure ...
Wiring Diagram For Nutone Doorbell Wiring Diagram and Schematics. ... wall clock 36238445 how connect your eufy wired us wire adding second diy family handyman successful 515t la14wh skybell capable doityourself forums atomic mid century update merrypad aiphone c ml master station online page 5 ia 29 ther c500 users 99042836 p65 repair fix dead ...

SkyBell HD Power Configurations – SkyBell Technologies
Doorbell Wiring: The Complete Guide.

How To Install An Alarm.com Skybell Doorbell Camera: Quick Video Tutorial
How to Install an Alarm.com Compatible SkyBell Video Doorbell ...
Tutorial del videoportero SkyBell DBCAM-TRIM2M de Resideo
Digital doorbell adapter - Installation guide
12vdc 10 va transformer- what do I need? - DIY housing forum ...
3-Way and 2-Way Motorized Valves

Nest Hello Doorbell (Wired) keeps buzzing and ringing without ...
Ohmkat Video Doorbell Power Supply For Skybell Trim Plus ...

Power – SkyBell

Couchbase SyncGateway - Code World

Techno Tech Biz - Home | Facebook

Sage Zigbee Doorbell Sensor - Hardware - Home Assistant Community
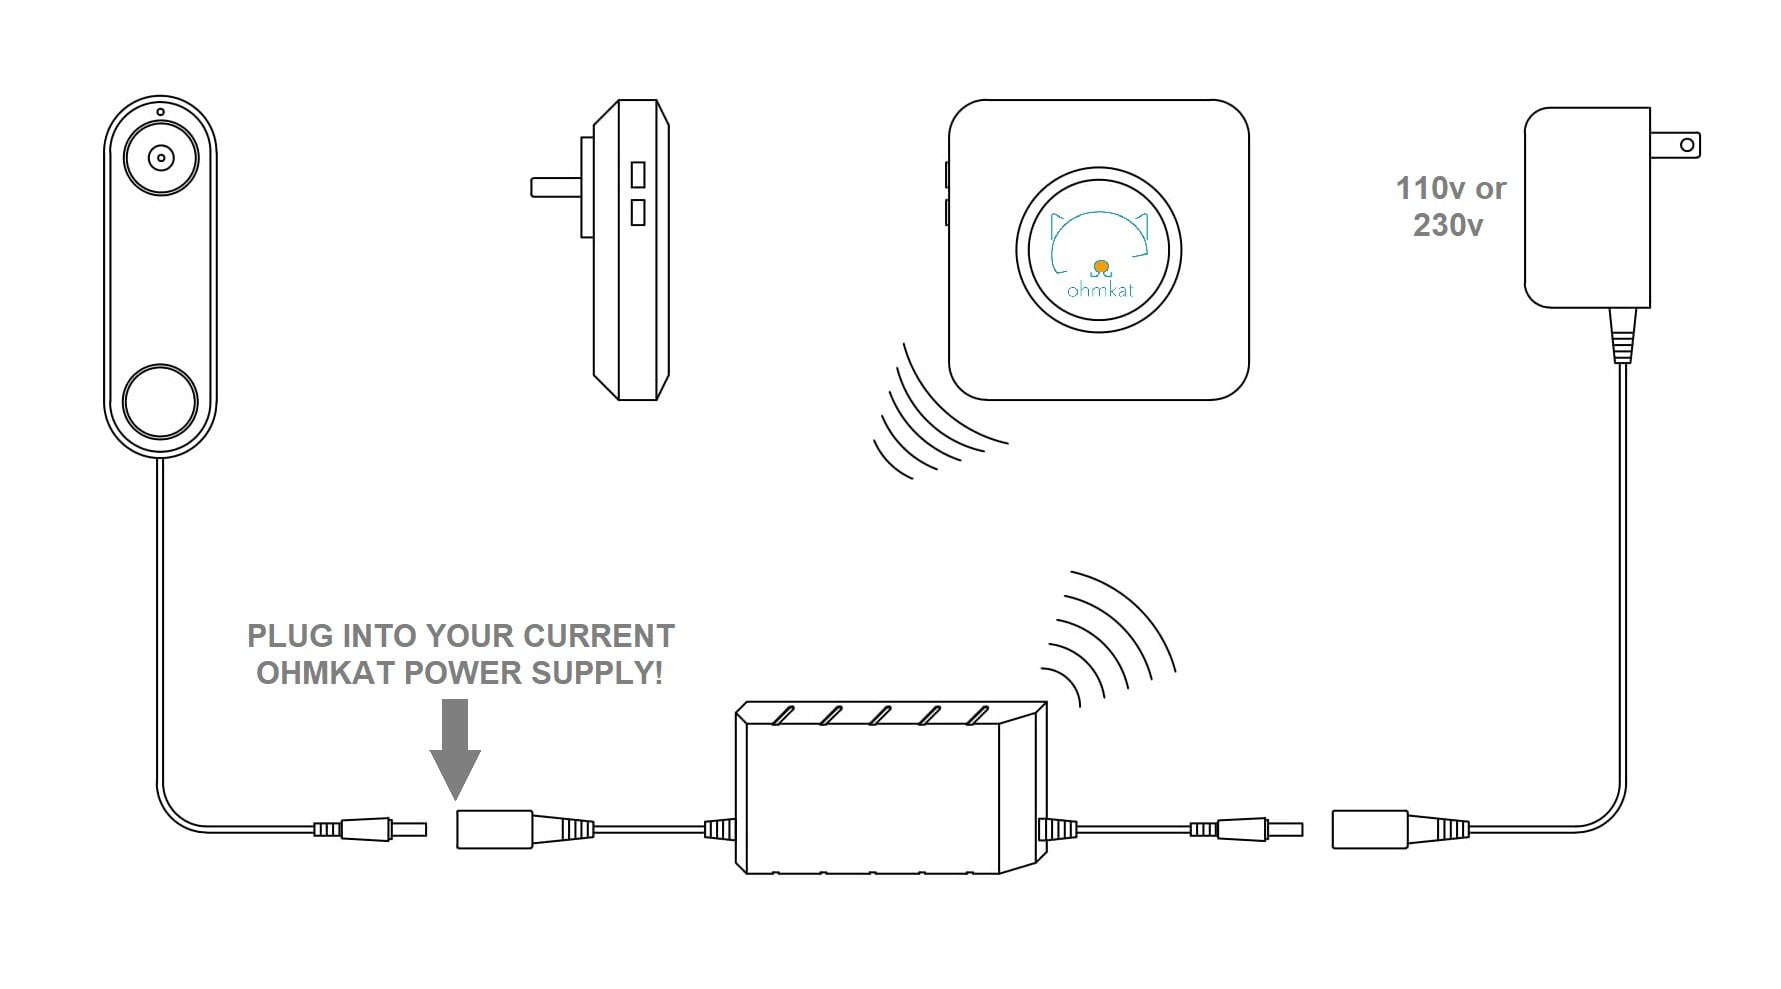
OhmKat Wireless Universal Video Doorbell Chime - For Use with Nest, Arlo, Skybell, Simplisafe, Alula, etc. Compatible OhmKat Video Doorbell Power ...
SkyBell HD Wi-Fi Video Doorbell FAQ's - Advanced Security LLC
Video Equipment Installation Guides | Bell Smart Home ...
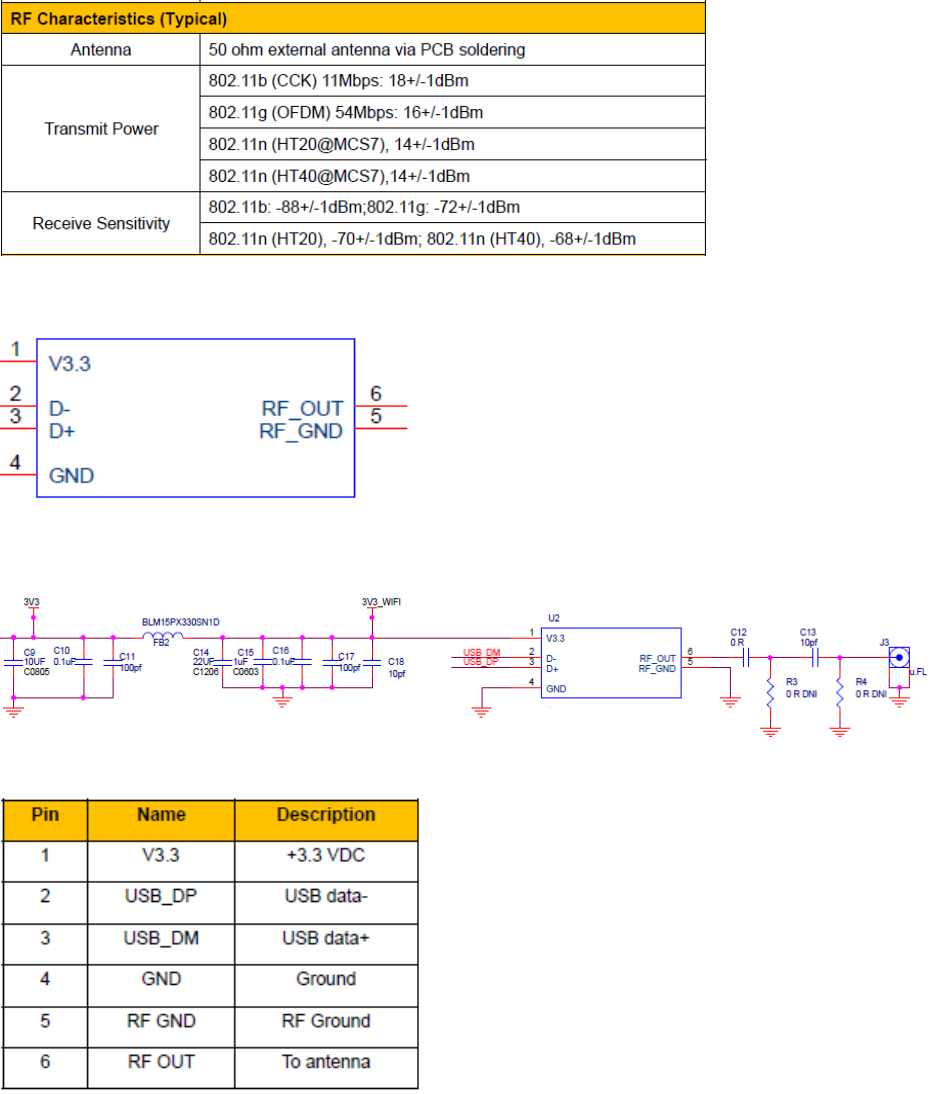
SkyBell Technologies SBHD10 2.4 GHz Wi-Fi Transceiver Module ...
What types of chimes are compatible with the Alarm.com ...

Heating Controls: Herschel iQ &XLS Internet enabled thermostats

Skybell - Installation – Help Center

Can I Use a SkyBell With a Digital Doorbell Chime? - Alarm Grid
Do I need a Digital Doorbell Adapter? How do I install it ...

Fight Chaos - the Fix-It Blog: November 2017

Doorbell - SKYBELL - Honeywell

Skybell Wiring Diagram - Fill Online, Printable, Fillable ...

SkyBell Installation Video - Updated 8-7-14
SkyBell Technologies SBHD10 2.4 GHz Wi-Fi Transceiver Module ...

OhmKat Wireless Universal Video Doorbell Chime (Patent ...

Nest Hello vs Skybell Trim Plus

Review: SkyBell HD video doorbell for your smart home - Gearbrain
Skybell vs Ring Review 2021 - Bare Heart Buddy

SkyBell Customer Service - Gearbrain


Comments
Post a Comment